
How To Take Your Own Family Photos
If you want to take your own family photos this year, either due to practicalities or budget constraints, then this is the post for you! I’m going to walk you through how to take your own family photos, step by step.
This is such a handy thing to know how to do, because it means you can take your own family portraits for things like holiday cards, or to hang on your wall, but also for other occasions, for example if you are away on holiday and fancy a group portrait, or for special occasions like birthdays. It also means you could take these multiple times a year, as opposed to just once a year with a professional photographer.
That said, it is easier to have a professional come in and take your photos, because they are able to simply focus on getting the best shot and making sure everyone is posed at they should be (after taking a set of family photos where my then-young son had his finger up his nose and I didn’t notice, you begin to appreciate these things ) and that everything is looking the way it should, rather than also having to worry about actually being in the photo too!
But of course, it is entirely doable to take your own family photos, so let’s get cracking on how to approach this!
Step 1: Plan Ahead
It’s really important when taking your own family photos that you do a bit of prep work upfront. Find a good location that has a pleasing, but not too distracting background, somewhere like a neutral coloured wall, or a field or wooded area is ideal.
I would also recommend visiting the area ahead of your photo shoot but at the same time you plan to shoot, so that you can see exactly what it will look like, and where the sun will be at the time you plan to shoot.
Have a list of poses you’d like to try and get, or just how you are going to shepherd everyone together, so that you don’t have to think about that as well as everything else on the day. I like to sketch out what I’m trying to achieve, so that it’s quick and easy to get everyone into a position.
If you have younger kids, then there is no way you are going to get them to look at the camera all at the same time, so I’d recommend a list of “poses” where they don’t have to, for example, have some prompts in your mind where you can get everyone hugging, or looking at each one other, so you don’t need to stress about trying to get everyone facing the camera at the exact same time!

Step 2: Get Your Camera Onto A Tripod
The first thing you’ll need - after the fairly obvious one of a camera - is a tripod.
Now, you could just try to find a flat surface to rest your camera on, such as wall, or improvise with a chair and a stack of books (done that) but it will be a lot easier and safer with a tripod.
Although you can get tripods that cost an arm and leg, you can also get some cheap and cheerful options if you don’t intend to use one that often.
Unfortunately the one I have has been discontinued (but this one looks pretty similar) and it was around $50, but beware the cheaper ones tend to be quite heavy. (If you intend lugging it up a mountain for example, this would NOT be the one I recommend!) The pricier the tripod, the lighter it will be whilst remaining stable, so keep that in mind when purchasing.
You can read more about choosing a tripod here - it’s an old post, but the info should still be relevant today.

Step 3: Set Up A Remote Trigger
A wireless / remote trigger is what allows you to “press the shutter” without actually being behind the camera,and there are a couple of ways to approach this, depending on your budget and your camera model.
The first is to simply use the timer option on your camera - this allows you to set a delay between pressing the shutter and taking the picture, but it is a pain in the butt to keep having to go back and forth (and your family will get fed up after 3 shots!) so this is best avoided.
You can buy a simple wireless remote that you simply point at the camera when you want to press the shutter, and it allows you to take a picture. You can get these for $10 for non-branded ones, and around $40 for branded ones (This is the one I have from Amazon Basics for my Canon Camera, but be sure to get one that is compatible with your own make and model, just search for wireless remote on Amazon)
The downside to these is that you have to try and “hide” the remote in your picture - it’s doable, but not ideal. (Or you could use this in conjunction with the timer on your camera)
For many cameras, you can get a smartphone app that works in the same way - by allowing you to press the “shutter” remotely, and use the self timer function.
However, instead of any of those, my absolute favourite thing though is one of these - an intervalometer.

I’m going to call it an Interval Timer because it’s easier to say and type, but it is a tool that is usually wired to your camera, and you set it to take a set amount of pictures over a certain period of time - for example, you could set it to take 50 photos, with one photo taken every 5 seconds. Once you have set it, you just leave it to "press the shutter" in the intervals you have set. This allows for more natural expressions because you’re not smiling inanely at the camera waiting for it to count down.
As with all things photography related, you can get expensive versions and low cost versions - I have a similar one to this low cost interval timer from Neewer and I love it. I’ve had it for about 7 years now, and it’s still going strong. Not bad for $25! Again, if you are getting one of these, be sure to pick one that suits your own camera body.
Step 4: Set Your Exposure
Get your aperture, shutter speed and ISO set for the perfect exposure. I would recommend shooting with a slightly tighter aperture that you would normally, to give you that little bit of wiggle room! Make sure you use a small enough aperture to get everyone in the frame in focus, and then go a little bit smaller.
If you need help with what aperture, shutter speed and ISO settings to use, you can download a manual settings cheat sheet here!
Step 5: Get Everyone Into Position
If you have kids to get in the frame, don’t bring them in until the last possible minute - they will get bored REALLY quickly, and having them all sit and wait for you whilst you get set up is zero fun. So set up, and if possible, grab your partner or an older (easily bribed) child, and just have them in the frame whilst you get a test shot to check your settings, background, composition etc. before bringing everyone else in.
Then, get everyone into position for the first “pose”, leaving a space for you to slot into.
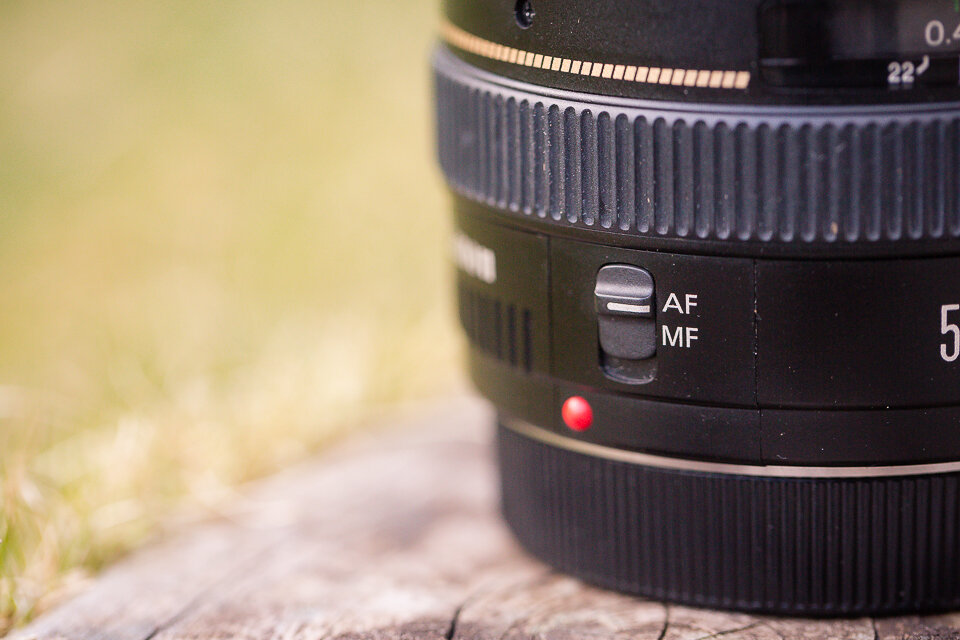
Step 6: Pre-Focus
Focus on the person in the middle of the frame, and half depress your shutter to lock focus then switch your lens from autofocus to manual focus - this is so important because it stops the camera from trying to refocus, which could throw it off and lead to a soft shot.
Step 7: Get in the frame!
Press the START button on your interval timer, and get yourself into position. The interval timer will go off as often as you have set it for (i.e every 5 or 10 seconds for 5 minutes) so you need do nothing else but interact with your family (and check your son doesn’t have his finger up his nose!!!)
You will end up with a LOT of wasted shots, but this is not the time to skimp on the number of photos you take! Remember, there is no-one behind the camera waiting for the perfect moment and being ready to snap the shutter at the most opportune time, so you’ll need a lot of crappy shots to get the one golden shot.
And don’t forget that you can swap heads in Photoshop if need be :)
Taking your own family photos can be a lot of fun, and of course, will allow you to get more pictures of your family in a year that you might do if you had to pay a professional for every single shoot! But I still recommend hiring a professional photographer to take your photos every so often - that’s when you’ll get more variety, and more shots that you love, because they can focus 100% on the photos, and pushing the shutter at the right time!


