
5 Tips For How to Remain Consistent When Editing
Tell me, are your photos all over the place when it comes to how you edit them? Do you like a soft and airy edit one day, and then a dark and moody one the next, and then maybe vintage with a touch of matte? When you view your images all together does it look as though they have been edited by around 30 people or someone with a serious multiple personality disorder (😁)?
Yes?
Then a) don’t worry about it too much as it happens to us all, and b) this is the blog post for you!
Editing your images is a skill to be learnt, just like when you learnt how to use your camera to take great pictures.
It is far, far more than just slapping on a preset and calling it a day (which let’s face it, is just like using AUTO on your camera!) and it is even more than simply following a tutorial for a certain look you found on Pinterest.
The other difference between pro photographers, and new photographers, is how consistent they are when editing their images. Pro photographers understand how to edit their images by looking at what each one needs, and then being able to do the same thing each time, so that even though the settings and location might be different, they have a group of images that have the same look and feel the others in their website or portfolio.
New photographers on the other hand, may not yet understand how to edit their images, or they don’t have a workflow in place, or perhaps just don’t have a strong enough editing style and therefore can get a bit carried away by all they can do with their editing program 😁
So in this blog post, I’m going to give you some tips that can help you remain consistent when editing, so that your images look more professional.
Let’s dive in!
#1 - Have a set “workflow” that you use
The single best way to ensure that your images look consistent across the board is to follow the same editing workflow each time.
A workflow is just a series of steps that you take, in the same order, every time single time you edit an image. We teach you a full step by step workflow - both for managing and editing your photos - in my Edit Like A Pro in Lightroom Classic program, so you never have to wonder about what to do next!)
This could mean using a preset, but presets are unlikely to give you that consistency you are looking for, simply because a preset can’t look at an image in the same way that you can.
Although they can be great as a starting point, every time you shoot your images will look a little different, and if you use one preset on one image it might look completely different on another, so you will pretty much always have to tweak your presets. Plus of course, a preset can’t give you just the right level of overall contrast, or exposure, or white balance, so there are ALWAYS things you need to do yourself. (Sorry!)
Therefore, I suggest getting one image from each “session” the way that you want it (which may mean running a preset first, then doing your tweaking for that individual image if you like) and then copying that editing steps over to the other images. You may need to go into each one after that and tweak the settings individually, but the bulk of the work is done on that first image, and then synced over so you remain consistent.
It also has the added bonus of speeding you your workflow!
*cue happy dance*

#2 - Have a pen and paper by your side
In many images, there will be some steps that you can’t simply copy over to other images, so you might want to keep a notepad by your desk when editing, so you can quickly jot your individual slider settings if need be, so that you give the same level of adjustment in each image.

#3 - Keep it the same within each session
Although it can be fun to try out different editing styles, you definitely do not want to do this within the space of a single session! I always want you to think about how each image would look if they were displayed together in a wall.
You wouldn’t want one image to be a high contrast black and white, another a vintage style, another a bold, colourful image and yet another with soft tones with a hazy matte effect, and another with a black and white but this time with some color toning over the top.
Instead, choose your editing style for that particular session and stick to it. Don’t do one image with a warm hazy feel, an another with a more gritty cool tones: try to keep everything so that they have the same look and feel.
There is no harm at all in doing an image in colour and then in black and white, but again, try to keep consistent with this. If you have edited the rest of your images in cool tones, don’t then add a warm film look to your black and white.
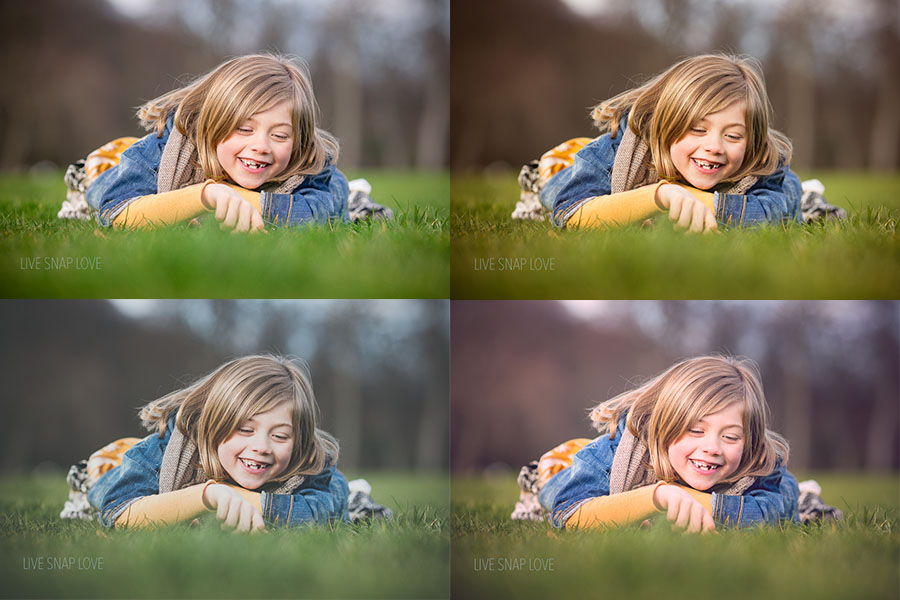
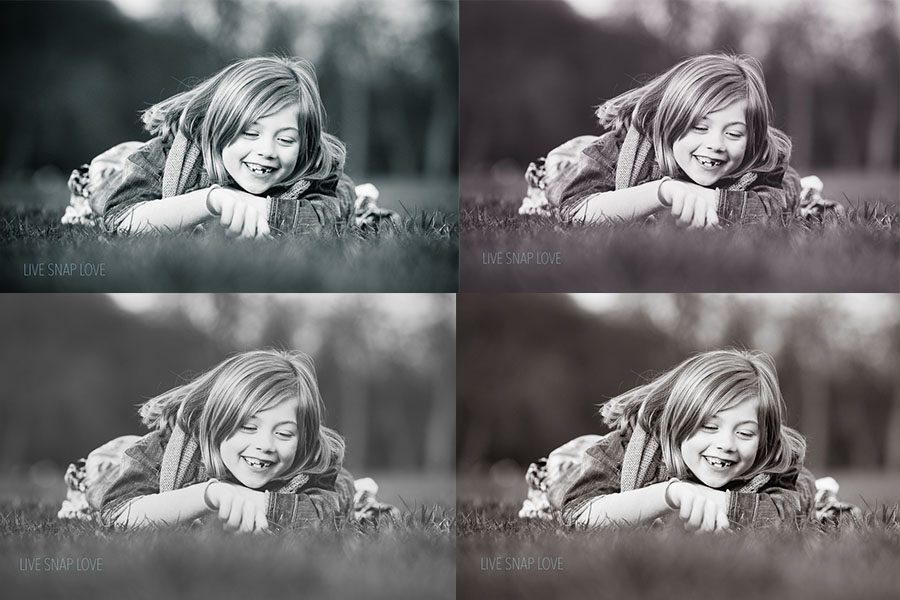
Take a look at these images here - it’s the same image, edited in no less than eight different ways. Even the black and whites look a little different from one another, just because of the different settings used.
The same thing also goes with crop dimensions: don’t crop one as a 6 x 4 and then another as a 5 x 7 and then another as a 5 x 4 - keeping those dimensions the same help keep the images cohesive and of course, make it much easier for you or your clients when it comes to printing your images!
#4 - Write Some Editing Words
One thing that can really help you remain consistent over time when it comes to editing images is to have some words written down that you are going to aim for OVERALL when editing. This way, when you edit one session from one week, and then another a month later, they will still have that same overall look and feel.
Have a think about some words that describe the editing style you want to remain consistent with. For example, you may choose to write down the words “Light” “Warm” and “Lively”, or perhaps “Soft”, “Hazy” and “Pink” - whatever suits the style you are trying to keep to for your overall look and feel.
Then, when you are editing, keep those words in mind (Post it on your computer to begin with if you like!) Then if you find yourself, hankering after a deep and gritty edit when your words are “Light” and “Warm” then you pretty much know that is is not going to be consistent with the rest of your portfolio 😁.
#5 - Set aside time for playing with your editing!
All that said, of course you want to have fun with your editing! Learning how to use new tools is fun (or using old tools in different ways) and is a great way to IMPROVE your current editing skills.
That is why I recommend that you take some scheduled time to play in your editing program, and try out new things, so that you don’t get tempted to do that when editing a session.
In Edit Like A Pro in Lightroom Classic we give you a whole editing framework to follow, but also some suggestions of things to try - like different split toning combinations (we even give you the numbers to use!) and adding things like sunglows, so you have a raft of editing techniques at your fingertips.
Of course, this may mean that your style changes a bit as you grow and learn more things, and that’s fine too! The key here is that your styles EVOLVES over time, not changes completely outright from day to day.
Making sure that you are consistent may take you a little longer to begin with, but as you get more proficient with editing, you’ll find that you will actually be able to edit QUICKER, and have your images look better for it!
Don’t forget to grab my FREE Lightroom Starter Kit, where you’ll get a step by step editing checklist, plus some editing presets so you can try out some different styles! (Plus you’ll get a guide to importing and an exporting cheat sheet so we’ve got you covered from start to finish!) Go here to grab your FREE copy!
Happy editing, peeps!